iRacing Season 2 2026 shipped four new HUD features: Layout Profiles, a Visual Spotter, a Throttle and Brake Timeline, and two new session widgets. Each one addresses something that drivers have been working around for a while. Here is what each feature does, how to enable it, and what it changes in practice.
HUD Layout Profiles
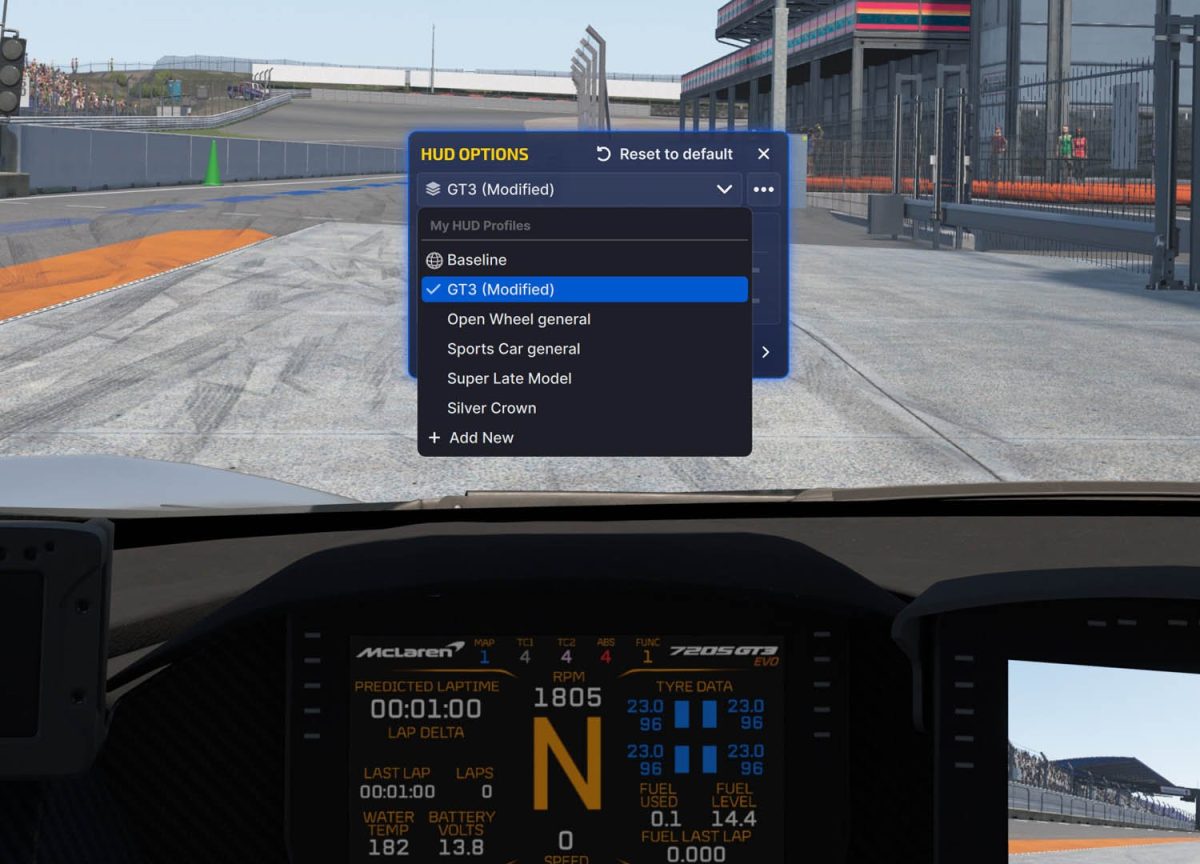
Layout Profiles are the most impactful HUD change in Season 2. The feature lets you create named HUD configurations and save them to your Documents/iRacing/profiles/hud folder. In addition, each profile saves your complete HUD layout. It tracks which widgets appear and where they sit, and how each one is configured.
The key feature is profile assignment. You can set one profile as your global default. It applies to any car or session that does not have its own profile set. You can also set per-car defaults, meaning a specific profile loads automatically for a particular car or car class. For example, if you have one HUD layout you want for all GT3 cars, set that once. It applies every time you jump in a GT3 car. Want a unique layout for the Porsche 911 GT3 R? Set that at the individual car level instead.
Beyond assignment, there is a load-without-saving option. Say you are in a race and rain starts mid-stint. You can load your wet-weather HUD profile without changing your saved defaults. When you restart or move to a new session, your saved defaults come back automatically. This makes it practical to have situational HUD setups without losing your baseline.
Managing and Sharing Layout Profiles
If you tinker with your HUD during a session and do not like where things ended up, you can revert to the last saved state of your current profile. Nothing is lost from what you had before you started adjusting.
Profiles are also shareable. The hud folder in your Documents/iRacing/profiles directory contains your saved profile files. You can hand that folder off to another driver or download one from someone in your league. If a teammate has a clean HUD setup you want, they can send you the file directly.
This replaces the old “Use custom HUD positions for this car” checkbox. That checkbox worked but lacked naming, per-class assignment, or sharing that the new system provides.
Visual Spotter
The Visual Spotter is an accessibility feature designed primarily for single-monitor setups. It uses the same data your audio spotter provides. It displays that data as a visual indicator on screen. You see which side a car approaches from. It shows overlap amount and when the lane clears, all without relying solely on the audio call.
One important thing to be clear about: this is not a radar. It uses the same data source as the standard iRacing spotter system. This means it carries the same latency and the same limitations. The audio spotter can miss a car approaching fast on your inside, the visual spotter will also miss it. Think of this as making the spotter output visible on screen rather than as adding a new awareness system.
To enable it, enter the Widget Editor while you are inside a car. The Visual Spotter appears there and you can position it wherever it works best for your screen layout. Once placed, it works out of the box with no additional configuration required.
For drivers on triple screens or with good mirror habits, this is likely a feature you will not need. For single-monitor drivers who relied on audio alone in close racing, having a visual confirmation of the same data is a genuine quality-of-life improvement.
Throttle and Brake Timeline
The Throttle and Brake Timeline is an addition to the existing Driver Inputs Widget, not a standalone feature. When enabled, it attaches a timeline graph to the Driver Inputs Widget that shows your pedal inputs over recent laps, not just where your inputs are right now, but a running history of where you have been applying throttle and brakes across the lap.
For self-coaching, this is practically useful. You can compare your input trace across multiple laps and start seeing patterns: where you are braking earlier in some laps versus others, where you are picking up throttle inconsistently through a corner exit, or where you are carrying brake input further into a corner than you intend to. These are things that feel consistent lap to lap but often are not, and the timeline makes the inconsistency visible.
Pair it with iRacing’s Best Lap comparison tools. Together, they form a solid self-coaching toolkit without needing external telemetry software. It does not replace full telemetry analysis. However, for drivers without dedicated data tools, it fills a gap.
To configure it, open the Widget Editor, navigate to the Driver Inputs widget, and enable the timeline option from there. The widget can also be undocked from the Session screen if you want it visible in a different position.
Session Info Widget
The Session Info Widget surfaces the information you actually need to keep track of a race at a glance: laps remaining, time remaining, the current in-sim session time, and whether scoring has ended for the session.
The scoring status indicator is more useful than it might initially seem. In endurance events or sessions with complex scoring conditions, knowing definitively that scoring is active or has ended removes a common source of confusion during the final stages of a long race. You add the widget through the Widget Editor and position it wherever it stays visible without cluttering your main driving view.
Session Rules Widget
The Session Rules Widget gives you a quick reference for the rules governing your current session. Driver change requirements, joker lap counts, mandatory tire changes, and other session-specific rules are surfaced here in a format you can glance at without leaving the session.
For league racing and endurance events where rules vary from event to event, this is a practical addition. Instead of having to remember before the race whether a driver change is required this week, or checking the series rules page mid-session, the answer is visible on screen. Add it through the Widget Editor like the other widgets.
How to Set Everything Up
All four features live through the Widget Editor, which you access from inside a car during a session, not from the main iRacing menu. Navigate to UI settings while in a session and look for the Widget Editor option.
For Layout Profiles specifically, the profile files live at Documents/iRacing/profiles/hud on your computer. You can back them up, share them with teammates, or import profiles from other drivers by working directly with that folder. If you are setting up profiles for the first time, the workflow is: get your HUD exactly how you want it for a given context, save it as a named profile, and assign it as the default for the relevant car or car class.
The HUD updates in Season 2 are changes that iRacing drivers have been requesting for a long time. Layout Profiles in particular removes a significant amount of manual work around HUD management for drivers who switch between car types regularly. If you have been rebuilding your HUD from scratch whenever you switch between a GT3 session and an oval race, Season 2 is the point where that stops being necessary.